If your laptop can’t boot into the operating system, you can use a bootable recovery USB drive to repair the boot loader.
🛈 Note: You can follow this guide to create a bootable USB drive.
1. When You Can’t Boot
If you can’t access your operating system or its recovery menu, it can often be repaired from a bootable USB drive.
-
Insert the USB drive.
-
Turn on your laptop and repeatedly press
F7to open the boot menu in AMI orF2/Down Arrow for coreboot.

2. Boot from the Recovery USB
Use the arrow keys to select your USB drive and press Enter to boot from it.
You’ll need to use the live mode of the USB — this is typically labelled Live, Try, or Start.
For Ubuntu, select Try Ubuntu.

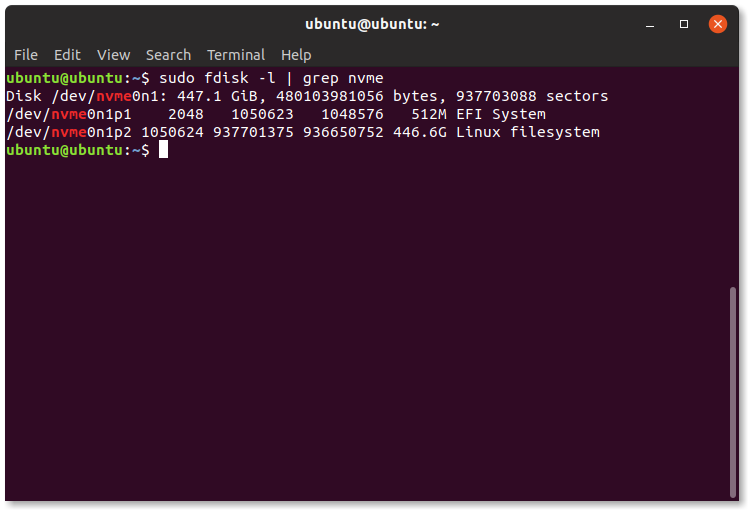
3. Check the Disk Path
Open the GNOME Launcher and start Terminal.
Then enter:
sudo fdisk -l | grep 'nvme\|sda'
4. Identify the Correct Partition
This command lists your storage devices — usually either sda or nvme.
Locate the main system partition (typically ending with a p2).
5. Mount the Partitions
Most systems have two partitions: one for the main system and one for EFI. Mount them by running:
sudo mount /dev/nvme0n1p2 /mnt
sudo mount /dev/nvme0n1p1 /mnt/boot/efi
sudo mount --bind /dev /mnt/dev
sudo mount --bind /dev/pts /mnt/dev/pts
sudo mount --bind /proc /mnt/proc
sudo mount --bind /sys /mnt/sys
6. Enable Networking (Optional)
If you need internet access while in recovery, run:
sudo cp /etc/resolv.conf /mnt/etc/resolv.conf
7. Connect to the Installation
Next, connect to your system installation with:
sudo chroot /mnt /bin/bash
8. You’re Now Connected
You are now in a root terminal running from your system’s internal drive.

9. Run Diagnostics and Repairs
From here, you can perform various repair tasks:
fsck– Check the file system
GRUB Repair – Update the boot loader
dpkg– Fix broken packages
If your issue was caused by an interrupted update (often leaving the system stuck at a GRUB prompt), try:
sudo dpkg --configure -a sudo apt -f install
You can find additional help in our guide on Booting into recovery mode.